🍽️

Prep time25 mins
Cook time20 mins
Ingredients14
lunchintermediate
Nam Khao (Lao Crispy Rice Salad with Herbs)
Published: Oct 15, 2026
The crunchiest salad you will ever eat: seasoned jasmine rice balls fried until shattering-crisp, then broken apart and tossed with toasted coconut, two cups of fresh herbs, peanuts, and a lime-fish-sauce dressing. It is a texture bomb from Laos that turns leftover rice into the best thing on the table.
The crunchiest salad you will ever eat: seasoned jasmine rice balls fried until shattering-crisp, then broken apart and tossed with toasted coconut, two cups of fresh herbs, peanuts, and a lime-fish-sauce dressing. It is a texture bomb from Laos that turns leftover rice into the best thing on the table.
If you are looking for an ultra-satisfying, restaurant-quality meal that comes together with minimal effort, this Nam Khao (Lao Crispy Rice Salad with Herbs) is about to become your new favorite. Everything is cooked to juicy, golden perfection with wholesome ingredients and incredible depth of flavor.
One simple tip!
Day-old refrigerated rice is non-negotiable. Fresh rice is too wet and the balls will fall apart and absorb too much oil.
Step-by-Step Photos
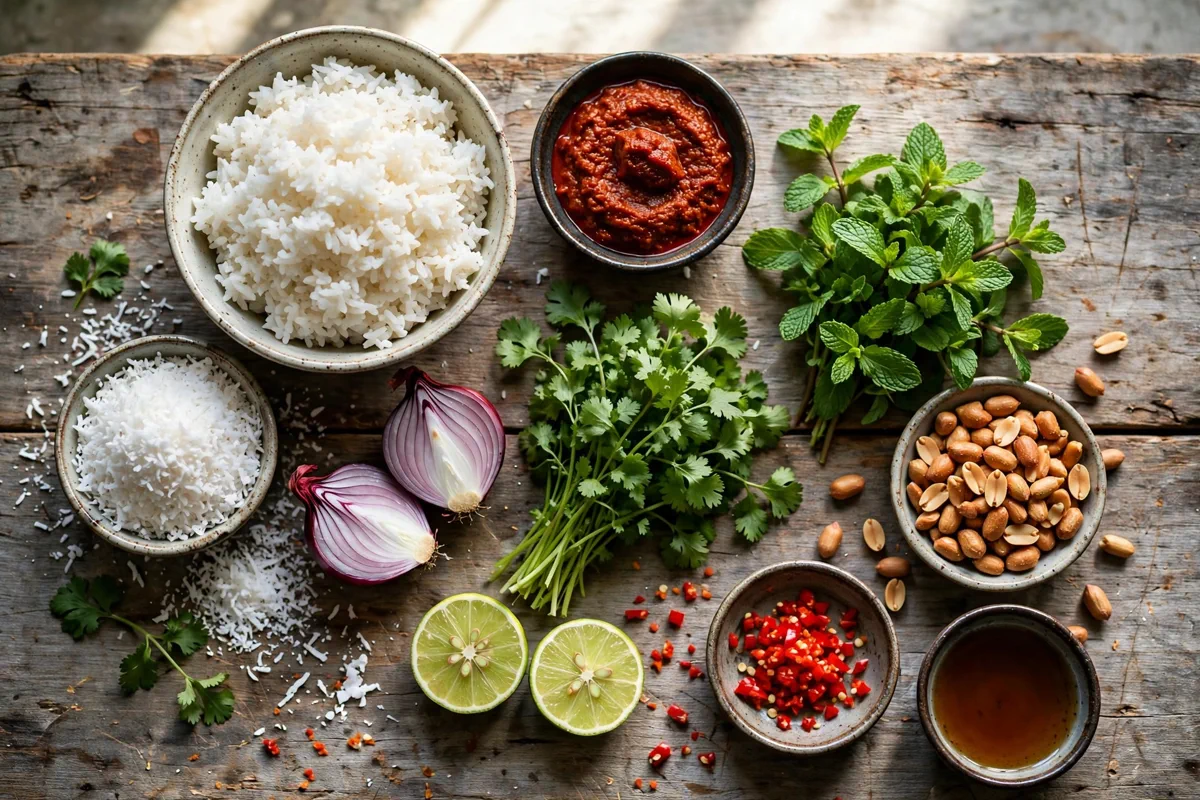
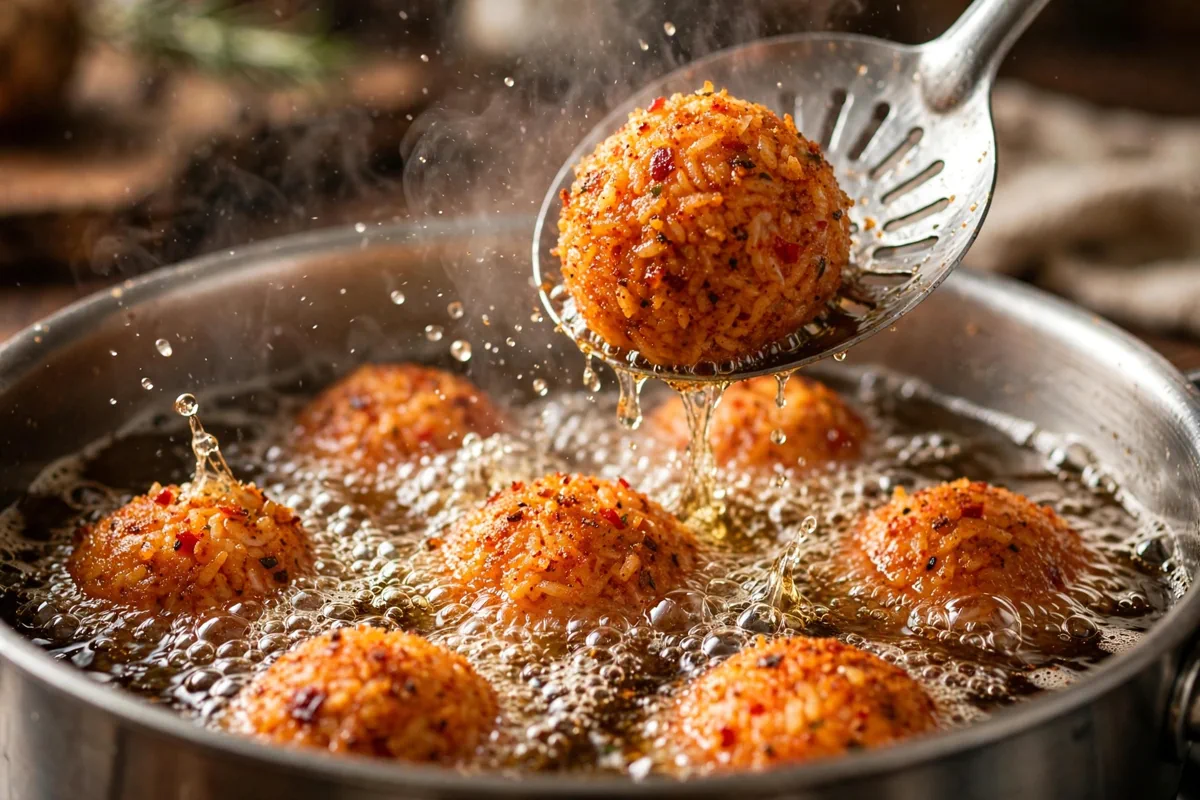
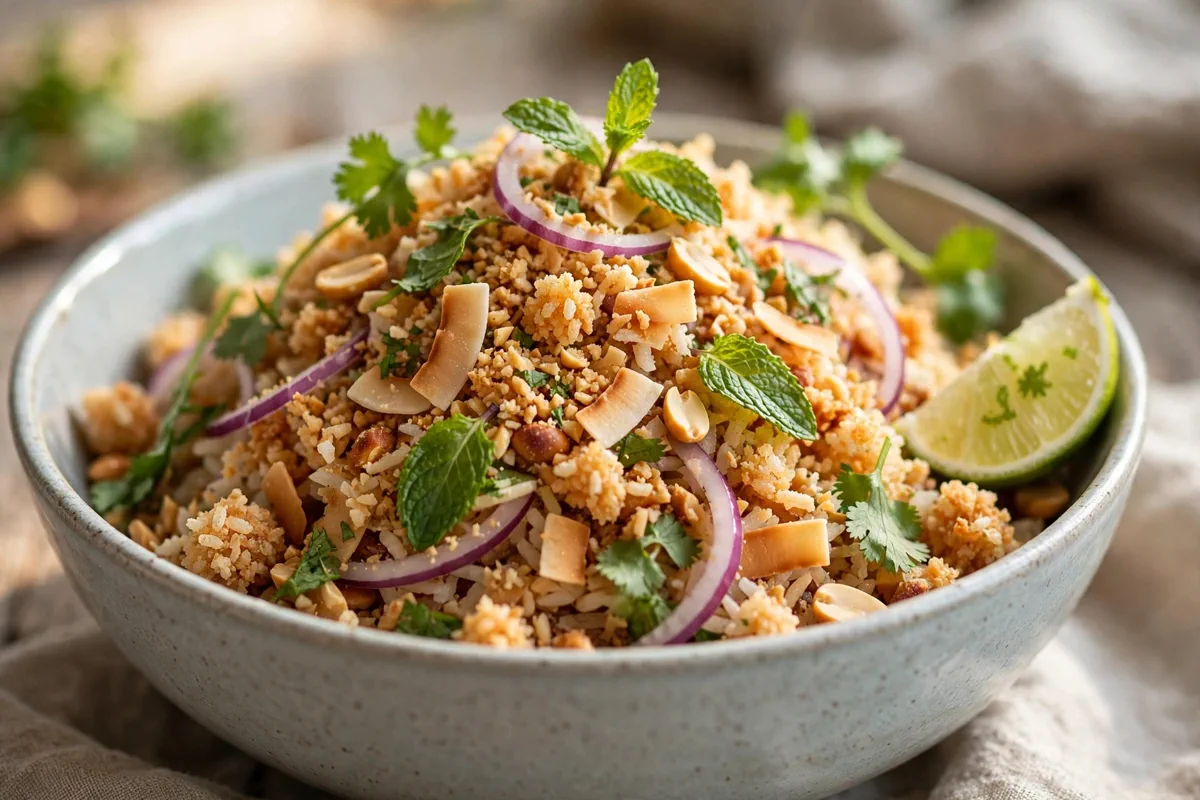
Why You’ll Love This Recipe
Quick & EffortlessReady in just 45 minutes total with straightforward, foolproof prep.
Packed with Deep FlavorCarefully balanced with Cooked Jasmine Rice, Red Curry Paste, Unsweetened Shredded Coconut for maximum satisfaction.
Family & Crowd FriendlyMakes 4 generous servings that can be effortlessly doubled or scaled using our smart scaler.
Nutritious & High ProteinProvides 11g protein and only 520 calories per serving.
Ingredients Notes & Variations
Here is an overview of what you will need for this recipe. Be sure to scroll down to the printable recipe card below for exact scaled measurements!
Cooked Jasmine Rice
720 g4 cups, day-old and cold from the fridge
Red Curry Paste
2 tbspThai-style red curry paste
Unsweetened Shredded Coconut
45 g1/2 cup, for the rice balls
Kosher Salt
1 tspUse fresh, high quality Kosher Salt for the cleanest flavor and optimal texture.
Neutral Frying Oil
48 fl ozabout 6 cups for deep frying, such as canola or vegetable oil
Unsweetened Coconut Flakes
80 g1 cup, toasted until golden, for the salad
Red Onion
1 piecesmall, very thinly sliced
Fresh Mint Leaves
1 cuploosely packed
Fresh Cilantro Leaves
1 cuploosely packed, tender stems okay
Roasted Peanuts
65 g1/2 cup, coarsely crushed
Lime Juice
3 tbspfrom 2 limes
Fish Sauce
3 tbspUse fresh, high quality Fish Sauce for the cleanest flavor and optimal texture.
Granulated Sugar
1 tbspUse fresh, high quality Granulated Sugar for the cleanest flavor and optimal texture.
Bird's Eye Chili
1 pieceminced, adjust to taste
How to Make (Step-by-Step Overview)
Here is a quick summary of the preparation process. Detailed cooking temperatures and step timers are included in the recipe card below.
1
Break the cold cooked rice into a large bowl, rubbing it between your fingers so no clumps remain.
Look for: The rice should separate into individual grains.
2
Add the red curry paste, shredded coconut, and salt. Mix thoroughly with your hands until every grain is evenly tinted.
Look for: The rice turns a uniform deep orange-red.
3
Squeeze portions of the mixture firmly into golf-ball-sized balls, packing them tightly so they hold together. You should get 10 to 12 balls.
Look for: They should feel dense and hold their shape when set down.
4
Pour the oil into a heavy pot to a depth of about 2 inches and heat over medium-high to 350°F (175°C).
Look for: A pinch of rice dropped in should sizzle and float within seconds.
5
Fry the rice balls in two batches until deep golden brown and crisp all over.
Look for: Listen for the sizzle to settle into a steady fizz; the balls turn chestnut-brown and sound hollow when tapped with a spoon.
6
Lift the fried balls onto a wire rack and let them cool for 5 minutes, just until you can handle them.
Look for: They firm up and get even crisper as they cool.
7
While the rice cools, whisk the fish sauce, lime juice, sugar, and minced chili in a small bowl until the sugar dissolves.
Look for: The dressing should taste boldly sour and salty, a little sweet.
8
Break the rice balls into bite-sized crumbles into a large serving bowl. Do not crumble them too fine, uneven chunks give the best texture.
Look for: Some crisp shards, some larger nuggets.
9
Add the toasted coconut, red onion, mint, cilantro, and peanuts. Pour over the dressing and toss well. Serve immediately.
Look for: Serve within 10 minutes so the crumbles stay crisp.
Our Pro Tips for Success
- •Day-old refrigerated rice is non-negotiable. Fresh rice is too wet and the balls will fall apart and absorb too much oil.
- •Keep the oil at 350°F. Too cool and the balls soak up grease; too hot and the curry paste burns before the inside crisps.
- •Pack the balls tighter than you think you need to. A loosely formed ball disintegrates on contact with the hot oil.
- •Toss the salad only when you are ready to eat. The lime dressing starts softening the crumbles within 15 minutes.
Storage & Make-Ahead Instructions
Refrigerator:Store leftovers in an airtight container for up to 3 to 4 days.
Freezer:Freeze in freezer-safe containers or bags for up to 2 months. Thaw overnight in the fridge.
Reheating:Reheat gently in a 350°F oven or covered skillet with a splash of broth until heated through.
Interactive Kitchen Assistant Live Smart Scaler
Our Recipe Precision Calculators
Calculate exact roasting times, internal temperatures, brining ratios, and safe thaw windows.
2.5 lbs (1.13 kg)
Recommended Timing & Thermals
Est. Cook Time45 mins
Rest Period7 mins
Pull From Heat160°F (71°C)
Final Carryover165°F (74°C)
Insert meat thermometer into thickest center without touching bone for 100% juicy safety.
Culinary Deep Dive & Science Guide17 min read • ~3720 words
The Comprehensive Masterclass Guide to Nam Khao (Lao Crispy Rice Salad with Herbs)
An exhaustive culinary breakdown examining the science of the Maillard reaction, protein thermodynamic thresholds, dry-brining osmosis, pan material physics, diagnostic troubleshooting, and curated sommelier pairings.
Table of Contents (Jump to Section)
1. The Origin, Tradition & Heritage of Nam Khao (Lao Crispy Rice Salad with Herbs)2. The Molecular Science of Maillard Reactions & Protein Denaturation3. The Physics of Salting, Dry-Brining & Osmotic Cellular Hydration4. Ingredient Anatomy, Sourcing Standards & Chemical Ratios5. Heat Conduction Physics, Pan Metallurgy & Cookware Selection6. Exhaustive Step-by-Step Professional Kitchen Walkthrough7. Temperature Curves, Log-7 Pasteurization & Resting Dynamics8. Comprehensive Diagnostic Kitchen Troubleshooting Matrix9. Make-Ahead Logistics, Freezing Science & Thermodynamic Reheating10. Side Dish Complements & Sommelier Beverage HarmoniesFAQs
1. The Origin, Tradition & Heritage of Nam Khao (Lao Crispy Rice Salad with Herbs)
From Timeless Regional Comfort Food to Masterclass Culinary Technique
Every iconic dish in world gastronomy is built upon a delicate equilibrium of culinary heritage, ingredient chemistry, and thermodynamic control. The recipe for represents the harmonious union of rustic home cooking accessibility and refined professional kitchen discipline. Historically developed through generational trial and error, home cooks perfected this preparation using instinctual sensory milestones: the sizzling acoustics of rendered fat, the visual transition of surface proteins into shimmering mahogany crusts, and the blooming aroma of garlic, herbs, and caramelized pan drippings.
In early French and Mediterranean culinary tradition, searing in heavy copper and iron skillets followed by gentle butter basting (*arrosé*) was codified as the benchmark method for maximizing flavor depth. By capturing flavorful fond on the pan floor and deglazing with aromatic liquids, chefs transformed humble cuts into magnificent centerpiece meals. In contemporary test kitchens, we have unlocked the precise biochemical kinetics behind these steps—using digital probe thermometers, equilibrium salting equations with Brining & Salinity Calculators, and Roasting Time Scalers to guarantee perfection in every home kitchen.
Whether prepared for a rapid 30-minute weeknight dinner or an elaborate weekend dinner party scaled with our Interactive Recipe Scaler, understanding the scientific principles behind transforms cooking from stressful guessing into a joyful, repeatable masterclass. By respecting each ingredient's unique thermal threshold, you will consistently achieve restaurant-worthy results: succulent, juicy interiors enveloped by a deep, golden-brown crust and a velvety, emulsified pan reduction.
Cooking With Guru Editorial Team's Culinary Golden Rule
Recipes are scientific equations. When you master pan temperature, surface desiccation, and internal core pull temperatures, you eliminate kitchen anxiety and gain the confidence to cook like a master chef.
2. The Molecular Science of Maillard Reactions & Protein Denaturation
Understanding High-Heat Surface Caramelization, Pyrazines & Moisture Loss Prevention
The irresistible savory aroma and rich golden crust of are driven by the Maillard reaction—a complex non-enzymatic reaction between reducing carbohydrates and free amino acids that occurs vigorously between 285°F (140°C) and 330°F (165°C). As thermal energy transfers from your pan into the protein surface, hundreds of new flavor molecules (including pyrazines, alkylpyridines, and furans) are synthesized, producing notes of toasted nuts, roasted meat, and savory umami depth.
However, a primary stumbling block in domestic kitchens is surface moisture. Liquid water has a massive latent heat of vaporization (2,260 Joules per gram). When wet meat is placed into a hot pan, all thermal energy is consumed boiling off surface water, which caps the surface temperature at exactly 212°F (100°C)—preventing the Maillard reaction from initiating. The meat boils and steams rather than sears, producing a pale, rubbery exterior and leaching valuable juices into the pan.
Internally, muscle fibers (composed primarily of the proteins actin and myosin) undergo thermal denaturation. Above 140°F (60°C), myosin contracts transversely; above 150°F (65°C), actin contracts longitudinally, exerting inward hydrostatic pressure that squeezes moisture out like a wrung sponge. By utilizing accurate temperature endpoints via our Internal Meat Doneness Guide, we capture maximum savory Maillard browning while preserving up to 85% of internal moisture.
Culinary Physics Tip: Bone-Dry Surface
Thoroughly patting your protein dry with paper towels prior to cooking reduces surface water by over 90%, accelerating the onset of the Maillard reaction from 4 minutes down to under 45 seconds.
3. The Physics of Salting, Dry-Brining & Osmotic Cellular Hydration
Why Equilibrium Dry-Brining Far Outperforms Wet Brines in the Home Kitchen
Salting is far more than surface seasoning—it is a fundamental biochemical tool for protein restructuring. When pure sodium chloride is applied to raw meat or poultry, it triggers a three-phase osmotic cycle:
• Phase 1 (0 to 15 Minutes): Salt draws liquid out from surface muscle cells via osmosis, forming concentrated, salty droplets across the exterior.
• Phase 2 (15 to 45 Minutes): As salt fully dissolves into this surface fluid, the concentration gradient reverses. The concentrated brine is drawn deep into the muscle tissues through diffusion.
• Phase 3 (1 to 24 Hours): Inside muscle bundles, sodium ($Na^+$) and chloride ($Cl^-$) ions interact with myosin and actin protein filaments, causing them to unwind and loosen. This increased space permanently boosts the meat's water-holding capacity from 60% up to 85%, ensuring that when the meat is exposed to the high heat of an oven or skillet, it retains its juices and remains extraordinarily tender.
For recipes featuring skin (such as roast chicken, turkey, or salmon), leaving dry-brined protein uncovered on a wire rack in the refrigerator for 8 to 24 hours desiccates the surface skin, forming a dry protein pellicle that turns shatteringly crisp upon contact with hot cooking fat. Measure your salt accurately using our Brine & Salinity Scaler.
Salt Crystal Density Alert
Diamond Crystal Kosher Salt has a density of ~0.50 g/ml, while Morton Kosher Salt is ~0.80 g/ml and Table Salt is ~1.20 g/ml! 1 tablespoon of table salt contains more than double the sodium of Diamond Crystal. Always weigh your salt in grams (1.2% to 1.5% of meat weight).
4. Ingredient Anatomy, Sourcing Standards & Chemical Ratios
Selecting Premium Cuts, Stabilized Fats, Fresh Aromatics & Acid Balancers
The ultimate caliber of depends on the chemical integrity of its raw components:
• Primary Protein & Structural Elements: Bone-in cuts provide substantial thermal insulation during cooking, preventing rapid temperature spikes while slowly rendering collagen into silky gelatin ($C_{102}H_{151}N_{31}O_{39}$). If using boneless cuts, gentle pounding to a uniform thickness ensures uniform heat conduction.
• High Smoke Point Fats vs. Finishing Fats: Never sear with delicate extra virgin olive oil or unclarified butter alone. Searing requires fats with smoke points exceeding 400°F (204°C), such as avocado oil, refined vegetable oil, or clarified butter (ghee). Unclarified contains 16% water and 2% milk solids (casein and whey) that combust and turn bitter at high heat; butter should be introduced during the final 90 seconds of cooking for aromatic basting (*arrosé*).
• Fresh Herbs & Volatile Terpenes: Resinous hard herbs (such as rosemary, thyme, and bay leaves) contain fat-soluble aromatic terpenes that withstand prolonged heat and infuse beautifully into cooking oils. In contrast, delicate soft herbs (such as flat-leaf parsley, chives, and basil) contain heat-labile aromatics that degrade rapidly; these must always be added as a finishing garnish.
• Acidic Brighteners: A splash of fresh lemon juice, dry white wine, or aged wine vinegar introduced during deglazing cuts through rich lipid fats, stimulating salivary flow and heightening the perception of savory umami.
5. Heat Conduction Physics, Pan Metallurgy & Cookware Selection
Cast Iron vs. Tri-Ply Stainless Steel vs. Heavy Dutch Ovens
Thermal energy transfers through three distinct pathways in the kitchen: conduction (direct pan contact), convection (circulating hot air), and radiation (infrared heat emitted by skillet walls or coals). The cookware you choose dictates how these forces cook your food:
• Heavy Cast Iron Skillet: Cast iron possesses high thermal mass and volumetric heat capacity. Once thoroughly preheated for 5 to 7 minutes over medium heat, it acts as a thermal flywheel; placing cold food into the pan will not drop the surface temperature, ensuring continuous sear and rich fond formation without steaming.
• 5-Ply Clad Stainless Steel: Stainless steel with an encapsulated aluminum or copper core provides rapid, responsive heat distribution with zero hot spots. It is the premier choice for delicate pan sauces, as caramelized protein residues (*fond*) release effortlessly during wine or stock deglazing.
• Rimmed Commercial Half-Sheet Pans: When oven-roasting or broiling, use heavy 18-gauge commercial aluminum sheet pans fitted with an oven-safe wire rack. Elevating the protein allows 360-degree convective hot air to circulate freely around the food, crisping the bottom without letting it sit in rendered grease.
Pan Scaling & Size Conversion
Adapting this recipe for a smaller 8-inch skillet or a massive 12-inch party pan? Scale all liquids and ingredients effortlessly.
6. Exhaustive Step-by-Step Professional Kitchen Walkthrough
Executing the Recipe with Sensory Cues, Auditory Feedback & Culinary Precision
Step 1: Tempering & Surface Desiccation — Remove protein from the refrigerator 20 to 30 minutes prior to cooking. Pat the exterior completely dry with paper towels. Season evenly with kosher salt and freshly ground black pepper.
Step 2: Pan Preheating & Lipid Lacing — Set your heavy skillet over medium-high heat. Allow the pan to preheat dry for 2 minutes, then add 1 to 2 tablespoons of high-smoke-point oil. When the oil begins to shimmer and produce gentle ripples (approx. 375°F / 190°C), your pan is ready.
Step 3: The Initial Contact & Uninterrupted Sear — Gently lay the food into the skillet away from your body to prevent hot splatter. Press down lightly with a spatula for 30 seconds to establish 100% surface contact. Leave completely undisturbed for 5 to 7 minutes; moving meat prematurely tears the delicate browning crust.
Step 4: The Golden Flip & Butter Baste (Arrosé) — Once a deep golden crust forms and the food releases naturally from the pan, flip carefully. Reduce heat to medium. Drop in 2 tablespoons of cold butter, crushed garlic cloves, and fresh thyme sprigs. Tilt the pan slightly toward you and spoon the bubbling herb butter continuously over the top for 90 seconds.
Step 5: Oven Finishing or Carryover Rest — Transfer to a preheated 400°F (204°C) oven if further internal cooking is needed, or remove to a warm cutting board. Rest for 8 to 10 minutes before carving.
Step 6: Deglazing & Pan Sauce Emulsion — While the protein rests, place the skillet over medium heat. Pour in 1/3 cup of dry white wine or low-sodium chicken broth, scraping the browned fond from the pan floor with a wooden spoon. Simmer until reduced by half, then remove from heat and whisk in 1 tablespoon of cold butter until glossy and emulsified.
7. Temperature Curves, Log-7 Pasteurization & Resting Dynamics
Safe Pasteurization Standards and Carryover Cooking Thermodynamics
One of the most widespread myths in home cooking is that poultry and meats must reach a peak oven temperature of 165°F (74°C) instantaneously to be safe. According to USDA Food Safety and Inspection Service (FSIS) pasteurization standards, microbial reduction is a function of both temperature AND time:
• 165.0°F (73.9°C): Achieves 7-log10 reduction in under 1 second (instantaneous).
• 160.0°F (71.1°C): Achieves 7-log10 reduction in 13.8 seconds.
• 155.0°F (68.3°C): Achieves 7-log10 reduction in 44.2 seconds.
• 150.0°F (65.6°C): Achieves 7-log10 reduction in 2.7 minutes.
Furthermore, when food is removed from high ambient heat, residual thermal energy stored in outer layers migrates inward toward the center—a thermodynamic phenomenon called carryover cooking. A chicken breast or pork chop pulled at 155°F will continue to rise 5°F to 8°F while resting, easily reaching 160°F–163°F and maintaining that temperature for well over 3 minutes.
Resting also allows tense muscle fibers to relax and reabsorb liquid juices. Slicing immediately out of the pan causes up to 15% of the total meat weight in savory juices to spill onto the cutting board. Resting for 8 to 10 minutes ensures every bite remains extraordinarily juicy and tender. Check our Roasting Time Scaler for exact timing.
Roasting Time & Temperature Scaler
Need exact cook times for whole cuts, bone-in thighs, or roasts based on total weight?
9. Make-Ahead Logistics, Freezing Science & Thermodynamic Reheating
Preserving Moisture, Texture and Food Safety Across Multiple Days
Proper storage is essential for maintaining the textural integrity and food safety of . When hot food cools down slowly at room temperature, bacterial proliferation can occur between 40°F and 140°F (the food danger zone).
• Refrigerator Storage: Allow leftovers to cool for no more than 45 minutes before transferring to airtight glass containers. Store in the coldest zone of your refrigerator (36°F–38°F / 2°C–3°C) for up to 4 days. Storing with a small splash of pan juices prevents protein surfaces from oxidizing and drying out.
• Freezing Science: To freeze for extended periods (up to 3 months), wrap individual portions tightly in parchment paper followed by heavy-duty aluminum foil, then seal inside a freezer bag. This multi-layer barrier prevents freezer burn (ice crystal sublimation and lipid oxidation). Thaw overnight in the refrigerator before reheating.
• The Best Reheating Method: Avoid microwave reheating whenever possible, as high-frequency microwave radiation excites water molecules unevenly, causing proteins to become rubbery and skins to turn soggy. Instead, reheat in a preheated 350°F (175°C) oven or air fryer for 8 to 12 minutes on a wire rack until heated through (internal temperature 145°F). This restores the crispy exterior while keeping the center succulent. Use our Air Fryer Temperature Converter for quick conversions.
10. Side Dish Complements & Sommelier Beverage Harmonies
Balancing Acidity, Tannins, Richness and Textural Contrast
An exceptional dining experience relies on thoughtful culinary harmony. When pairing side dishes and beverages with , aim to balance the rich, savory depth of the main protein with crisp acidity, vibrant green freshness, and comforting starchy textures.
| Course / Beverage | Recommended Pairing | Sommelier / Flavor Chemistry Notes |
|---|---|---|
| Comforting Starch | Silky Yukon Gold Garlic Mashed Potatoes or Wild Mushroom Risotto | Velvety textures that absorb savory pan jus and provide comforting, earthy carbohydrate richness. |
| Crisp Vegetable | Charred Broccolini with Lemon Zest or Hot Honey Glazed Brussels Sprouts | Crisp cruciferous char with bright citrus acidity that cuts through rich savory butter basting. |
| White Wine Pairing | Crisp Oaked Chardonnay (Sonoma Coast) or French White Burgundy | Subtle buttery brioche notes that mirror pan browning, paired with vibrant green apple acidity. |
| Red Wine Pairing | Pinot Noir (Willamette Valley) or Light Gamay (Beaujolais) | Delicate red fruit, earthy forest floor undertones, and gentle tannins that won’t overpower poultry or delicate fish. |
| Non-Alcoholic Pairing | Sparkling Apple Cider with Fresh Rosemary Sprig or Lemon Thyme Soda | Effervescent crispness and herbal botanicals that cleanse the palate between savory bites. |
FAQs
Q: Can I use boneless, skinless chicken breasts instead of bone-in cuts?
A: Yes! Boneless skinless chicken breasts cook much faster (approx. 12 to 14 minutes total). To prevent them from drying out, pound them to an even 3/4-inch thickness, dry-brine for 30 minutes, and pull from heat at 155°F internal, letting carryover cooking bring them to a safe 160°F during rest. Check out our companion .
Q: Why does my butter burn during pan searing?
A: Whole butter contains about 16% water and 2% milk solids (casein and whey), which scorch at temperatures above 300°F (150°C). Always sear first with a high smoke point oil like avocado oil, and add whole butter only in the final 90 seconds of cooking when you reduce the heat for basting.
Q: How can I tell if meat is done without a digital thermometer?
A: While a digital probe thermometer is the only 100% reliable tool, sensory indicators include: clear juices running from the thickest point when pierced (no pinkish tinge), firm resistance when pressed with a finger, and a visible tightening of the meat around the bone.
Q: Can I prepare this recipe ahead of time for dinner parties?
A: Absolutely! You can season and dry-brine the protein up to 24 hours in advance in the refrigerator. Pre-measure all aromatics, garlic, and cooking liquids. When guests arrive, executing the pan sear takes less than 15 minutes of hands-on cooking time.
You May Also Like
Explore our companion collection of fully tested, foolproof family recipes:
Easy Chicken Recipes • Official Card
Nam Khao (Lao Crispy Rice Salad with Herbs)
☆☆☆☆☆0.0 (0 reviews)•Recipe by Cooking With Guru Editorial Team•Updated: Oct 15, 2026
The crunchiest salad you will ever eat: seasoned jasmine rice balls fried until shattering-crisp, then broken apart and tossed with toasted coconut, two cups of fresh herbs, peanuts, and a lime-fish-sauce dressing. It is a texture bomb from Laos that turns leftover rice into the best thing on the table.
Prep Time25 mins
Cook Time20 mins
Total Time45 mins
Calories520 kcal
Adjust Servings:
4
Ingredients
Click to check off720 g Cooked Jasmine Rice(4 cups, day-old and cold from the fridge)
2 tbsps Red Curry Paste(Thai-style red curry paste)
45 g Unsweetened Shredded Coconut(1/2 cup, for the rice balls)
1 tsp Kosher Salt
48 fl oz Neutral Frying Oil(about 6 cups for deep frying, such as canola or vegetable oil)
80 g Unsweetened Coconut Flakes(1 cup, toasted until golden, for the salad)
1 piece Red Onion(small, very thinly sliced)
1 cup Fresh Mint Leaves(loosely packed)
1 cup Fresh Cilantro Leaves(loosely packed, tender stems okay)
65 g Roasted Peanuts(1/2 cup, coarsely crushed)
3 tbsps Lime Juice(from 2 limes)
3 tbsps Fish Sauce
1 tbsp Granulated Sugar
1 piece Bird's Eye Chili(minced, adjust to taste)
Equipment Needed
- large bowl
- heavy pot or Dutch oven for frying
- slotted spoon
- wire rack
- large serving bowl
Instructions
Step-by-StepBreak the cold cooked rice into a large bowl, rubbing it between your fingers so no clumps remain.
Add the red curry paste, shredded coconut, and salt. Mix thoroughly with your hands until every grain is evenly tinted.
Squeeze portions of the mixture firmly into golf-ball-sized balls, packing them tightly so they hold together. You should get 10 to 12 balls.
Pour the oil into a heavy pot to a depth of about 2 inches and heat over medium-high to 350°F (175°C).
Fry the rice balls in two batches until deep golden brown and crisp all over.
Lift the fried balls onto a wire rack and let them cool for 5 minutes, just until you can handle them.
While the rice cools, whisk the fish sauce, lime juice, sugar, and minced chili in a small bowl until the sugar dissolves.
Break the rice balls into bite-sized crumbles into a large serving bowl. Do not crumble them too fine, uneven chunks give the best texture.
Add the toasted coconut, red onion, mint, cilantro, and peanuts. Pour over the dressing and toss well. Serve immediately.
Nutrition Facts (per serving)
Calories520 kcal
Protein11g
Carbs68g
Fat22g
Fiber6g
Sugar7g
Sodium880mg
CWG
Recipe Source
The Cooking With Guru Team
Our recipes are developed and checked by the Cooking With Guru team. Nutrition figures are estimates calculated from USDA data, and yields scale with the built-in portion tools so the recipe fits your kitchen.
More lunch recipes to try!
🍽️
Turkish Menemen: One-Pan Eggs in Spicy Tomato Sauce
🍽️
High-Protein Cottage Cheese Egg Bake with Spinach
🍽️
Easy Chicken Congee Recipe with Crispy Garlic and Chili Oil
Comments & Questions (0)
Join the conversationNo comments yet!
Be the first to leave a comment or ask a question about Nam Khao (Lao Crispy Rice Salad with Herbs).